Lumen is a new Php micro-framework developed by Taylor Otwell, the same author of the famous Laravel framework. I wanted to give it a try and I am here to share my experimentations. I am not an expert of Lumen (yet), but I think one of the best characteristics of this framework is that it makes really really easy to bootstrap a new project. So to prove this, we will now build a fully functional app backed by a MySql database in less than 30 minutes. Are you ready to start?
A motivational quote everyday
Our app should be quite simple but I’d like also to make something useful. I am a big fan of motivational quotes, and if you follow me on Twitter (you should!) you probably already know it!
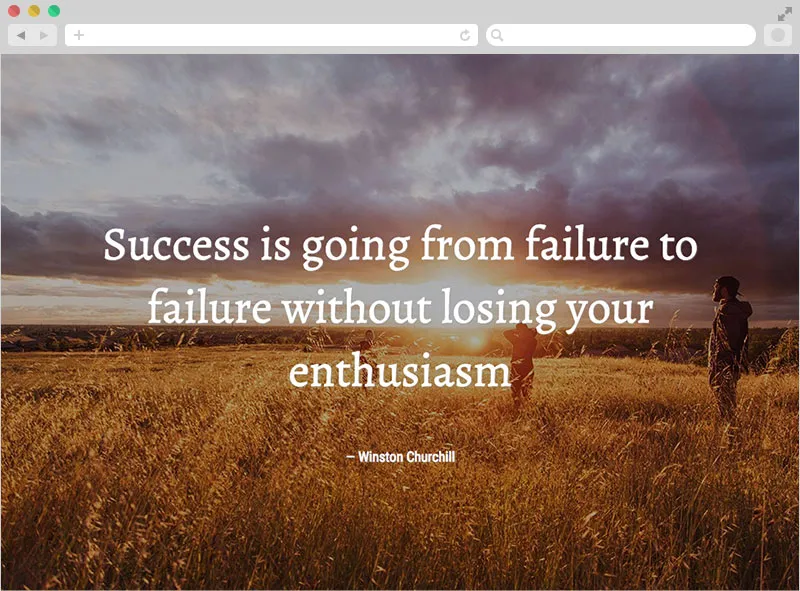
So, the idea is to build a web app that showcases a new quote everyday. This way, everyday when you wake up you can run your application and be inspired and motivated by a wise and energising quote to do your best! To work best our app should obviously be fancy, with über cool background images, like in the screenshot above. That’s an importante detail!

A new Lumen project
Let’s start. First of all, to create a new Lumen project, we need to have the Lumen command line installer. A very simple tool, which in turn uses Composer, that allow us to bootstrap a new Lumen project in few seconds. To get it ensure to have installed Composer globally and run the following command:
composer global require "laravel/lumen-installer=~1.0"Note: you might need to use sudo, depending on the way you installed Composer.
Once we have done this we have a new toy in our shell: the lumen command. We can now create a new project by running:
lumen new motivationalmotivational is the name of our new app. The command creates a new folder for it and downloads all the dependencies.
To see our application live we need to cd into our motivational folder and run
php artisan serveOur project will be immediately up and running on http://localhost:8000.
Define the data model
We said we want to showcase quotes and in our case a quote is made up by:
- a text (The quoted text itself)
- an author (The name of the author of the quote)
- a background image (Yes, to make everything fancier)
In order to manage data from the database, we need to enable Eloquent (the Lumen/Laravel ORM library), configure our database connection, create a migration and a model and finally seed our database. Let’s do it step by step.
Enable Eloquent
To enable Eloquent we need to edit the file bootstrap/app.php and remove the comment on the following lines:
$app->withFacades();
$app->withEloquent();
Notice that the first line enables the support for Facades (a very common feature used in Laravel and inherited by Lumen) that simplifies the usage of some of the core classes of the framework.
Configure the database connection
First of all, be sure to have an instance of MySql running on your machine and to have the credentials to connect to it. Now let’s create our .env (Dotenv) configuration file. Copy the .env.example file into a new .env file and open it in your favourite editor.
Here we need to edit the following lines and provide the details needed to connect to our local mysql instance:
DB_CONNECTION=mysql
DB_HOST=localhost
DB_DATABASE=homestead
DB_USERNAME=homestead
DB_PASSWORD=secret
Be sure to create the database (homestead in this case, but you can obviously customise it).
It’s also a good idea in general to change the APP_KEY value into some random string in case you are building a “serious” application.
To make Lumen load this configuration file we need, again, to edit the bootstrap/app.php file and uncomment the following line:
Dotenv::load(__DIR__.'/../');Create a migration
Migrations allows the framework to keep the database schema under control. They define all the database tables and fields programmatically and keep track of the various changes on them (so that we can easily update and rollback the whole schema when needed). We need to initialise the migration system with the command:
php artisan migrate:installThis command creates a special table in our database called migrations that will be used internally from the framework to keep track of all the available migrations and the current one used.
Every migrations is identified by a file that generally lives in the database/migrations folder. The file describes the changes in our schema (eg. new tables, new fields, new indexes, tables to be deleted, etc…). In our case we need to create a new table, the “quotes” table to be precise. Let’s run this:
php artisan make:migration --create=quotes create_quotes_tableIt creates a new file under the database/migrations folder that we can easily edit to add the fields we want to have in our table. We just need to tweak the up() function a bit:
public function up()
{
    Schema::create('quotes', function(Blueprint $table)
    {
         $table->increments('id');
    			     $table->timestamps();

         // our new fields
    			     $table->string('text');
    			     $table->string('author');
    			     $table->string('background');
    });
}
To execute the migration (and effectively create the table on the database) we have to run:
php artisan migrateCreate the Quote model
In general, a model is a class used to abstract our data and represent it as an object. In ORMs a model class also offers static methods to query the data storage to retrieve the data from the data source and create the corresponding objects.
In our case we need to define the Quote model in app/Models/Quote.php:
<?php

# app/Models/Quote.php

namespace App\Models;

use Illuminate\Database\Eloquent\Model;

final class Quote extends Model
{

}
Yes, that’s it… we don’t really need to write anything else! We are extending the Eloquent Model class that does all the hard work for us, proving a standard model configuration that is good enough most of the times. In this case it automatically maps the class Quote to the quotes table that we created before.
Seed the database
The seeding process allows us to populate our database with initial data. In our case we can use it to provide some quotes. It’s quite useful because we will not build a full fledged admin to do the data entry at this stage (and we also will not have to touch the database manually).
Seeds files are stored in database/seeds and we need to create a new file there. We will call it QuoteTableSeeder.php:
<?php

# database/seeds/QuoteTableSeeder.php

use App\Models\Quote;
use Illuminate\Database\Seeder;

class QuoteTableSeeder extends Seeder
{
    public function run()
    {
        Quote::create([
            'text' => 'Success is going from failure to failure without losing your enthusiasm',
            'author' => 'Winston Churchill',
            'background' => '1.jpg'
        ]);

        Quote::create([
            'text' => 'Dream big and dare to fail',
            'author' => 'Norman Vaughan',
            'background' => '2.jpg'
        ]);

        Quote::create([
            'text' => 'It does not matter how slowly you go as long as you do not stop',
            'author' => 'Confucius',
            'background' => '3.jpg'
        ]);

        //... add more quotes if you want!
    }
}
The code is quite self explanatory: every call to Quote::create inserts a new record into the quotes table with the data provided into the array passed as argument. The only thing worth noticing is that we are passing a relative reference to a file in the background field. You need to have these files into your public/img/ folder, as this allows us to serve these files to the browser. If you need some good royalty-free photos have a look at the Unsplash project.
To enable this seed script we need to link it to the main DatabaseSeeder script by adding the following line within the run() method:
$this->call('QuoteTableSeeder');Now we just need to launch the following command to execute the seed script and populate the database:
php artisan db:seedDamn, we got a Class QuoteTableSeeder does not exist! That’s why by default Lumen Composer file maps the database path with the classmap strategy. That means that every time Composer dumps the autoloader, it creates a static map of all the classes available inside that folder. So every time we add a new class there we need to manually re-dump the autoloader script:
composer dump-autoloadNow let’s run again php artisan db:seed and this time everything should be fine. If you explore your database you will see some records within the quotes table.
The routing
Until now we just defined the data model of our application and populated our database. Now we will add some business logic and we will map it to some routes.
We will have two routes:
- GET
/- the main route, providing a new quote everyday - GET
/{id}- the route of a specific quote, mapped by id
To define the business logic associate to a route we have to edit the app/Http/routes.php file:
<?php

# app/Http/routes.php

use App\Models\Quote;

/**
 * Display the today quote
 */
$app->get('/', function() use ($app) {

    /*
     * Picks a different quote every day
     * (for a maximum of 366 quotes)
     *
     *   - $count: the total number of available quotes
     *   - $day: the current day of the year (from 0 to 365)
     *   - $page: the page to look for to retrieve the
     *            correct record
     */
    $count = Quote::query()->get()->count();
    $day = (int) date('z');
    $page = $day % $count + 1;

    $quotes = Quote::query()->get()->forPage($page, 1)->all();

    if (empty($quotes)) {
        throw new \Illuminate\Database\Eloquent\ModelNotFoundException();
    }

    return view('quote', ['quote' => $quotes[0]]);
});

/**
 * Display a specific quote
 */
$app->get('/{id}', function($id) use ($app) {
    $quote = Quote::query()->findOrFail($id);
    return view('quote', ['quote' => $quote]);
});
The two $app->get defines the two routes we need for our app. For every route we define the business logic within a closure function. The code is very straightforward and, thanks to the comments, it should be quite easy to understand.
The view() function allow to render a template. In this case we are rendering the quote template passing the model as quote variable. In the next paragraph we will see how to define our template.
Note: if you don’t want to use closures in your routing and you want to have a greater control on the structure of your code and your business logic you can leverage Laravel’s controllers. I will not go into the detail of this, but you can check the Documentation that shows how to do it. It’s quite simple anyway.
The template
Lumen uses the Laravel default template language, Blade. Blade allows us to render complex HTML code in a easy way. All the templates live in the resources/views folder. Let’s create the quote.blade.php file:
<!-- resources/views/quote.blade.php -->

<html>
<head>
    <title>Motivaitonal — Your daily source of motivation!</title>
    <link href="/css/style.css" rel="stylesheet" type="text/css"/>
    <link href='http://fonts.googleapis.com/css?family=Alegreya:400,700|Roboto+Condensed' rel='stylesheet' type='text/css'>
</head>
<body style="background-image: url('/img/{{$quote->background}}')">
<div class="container">
    <div class="quote-container">
        <p class="text">{{$quote->text}}</p>
        <p class="author">— {{$quote->author}}</p>
    </div>
</div>
</body>
</html>
As you can see we can use the double curly braces syntax to reference variable values.
To finish we just need to create our public/css/style.css stylesheet file:
html,
body {
  height: 100%;
  padding: 0;
  margin: 0;
}

body {
  background-size: cover;
}

.container {
  height: 100%;
  background: rgba(0, 0, 0, 0.3);
}

.quote-container {
  position: relative;
  top: 50%;
  transform: translateY(-50%);
  padding: 2em 4em;
}

.quote-container p {
  text-align: center;
  color: #fff;
  text-shadow: 1px 1px 1px rgba(150, 150, 150, 0.8);
}

.quote-container p.text {
  font-family: 'Alegreya', serif;
  font-size: 4em;
}

.quote-container p.author {
  font-family: 'Roboto Condensed', sans-serif;
  font-size: 1.2em;
}
That’s it, now your app is up and running. Isn’t it beautiful? Hey, let me know if you decide to publish it and motivate the whole world! ;)
Conclusions
Lumen seems to be a very promising framework for the fast prototyping of small web apps. I look forward to use it again for slightly more complex use cases where I can adopt other interesting features like the cache layer and the job queue library. Have you already used Lumen? Do you think it will become a mainstream framework along Laravel or it will just be another of the hundreds of Php framework available out there? I’m really curious to know what you think about it, let me know it in the comments!
Best regards and have a very motivated day ;)


